Secrets to Smooth Granola Butter: Toasting & Ingredient Tips
Forget everything you thought you knew about spreads. While the world loves its peanut, almond, and even cashew butters, there’s a new contender that’s winning hearts and palates alike: granola butter. Imagine the comforting, wholesome flavor of your favorite oatmeal cookie or a warm bowl of granola, but in a lusciously smooth, spreadable form. That’s exactly what you get when you learn
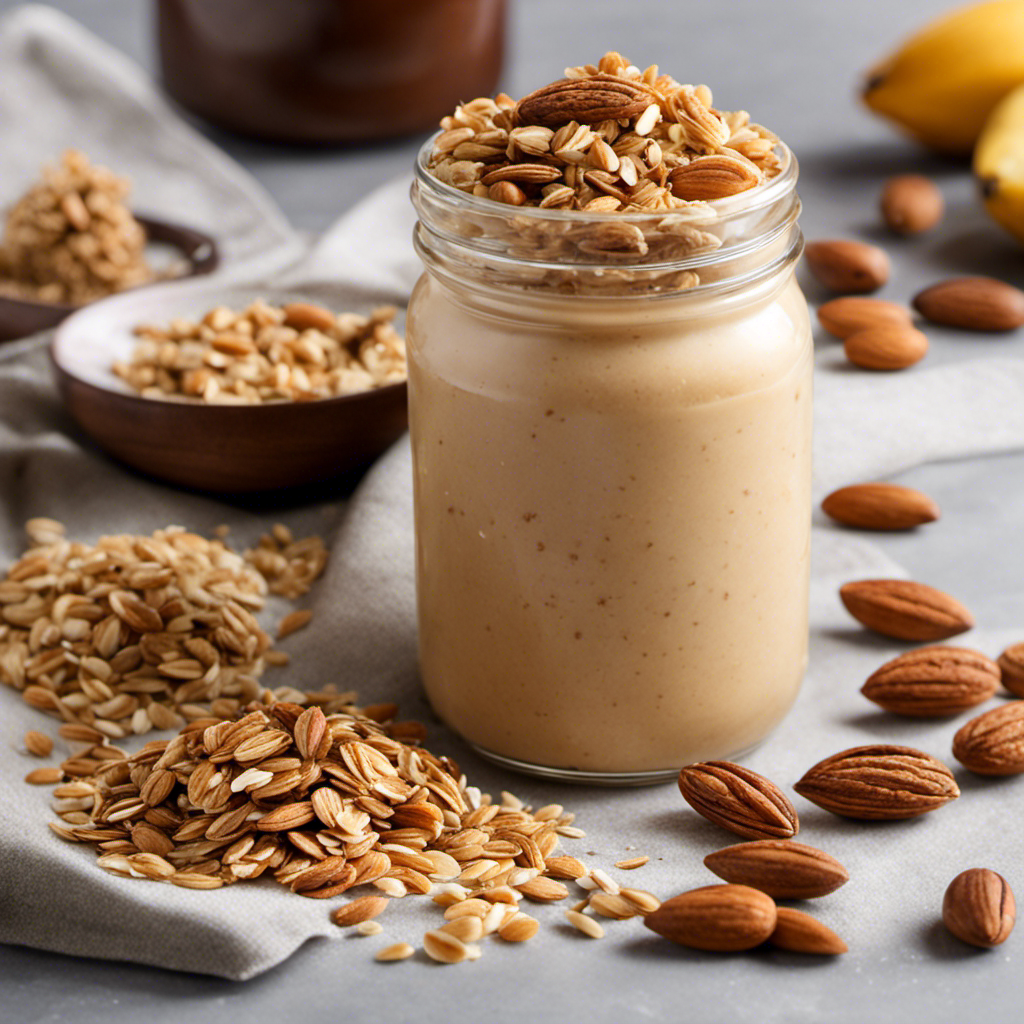
how to make granola butter. This unique creation is not only a delightful gluten-free, dairy-free, and often oil-free and refined sugar-free alternative to traditional nut butters, but it also offers a distinctive taste and impressive nutritional benefits.
This versatile spread combines the best aspects of nut butter, granola, and oatmeal, delivering a rich, creamy texture and a deeply satisfying flavor profile. Perfect for dipping, spreading, or simply enjoying by the spoonful, homemade granola butter is a game-changer for anyone seeking a healthier, more adventurous pantry staple. If you’re ready to revolutionize your breakfast or snack routine, read on to unlock the secrets to crafting your own perfectly smooth and flavorful granola butter. For more insights into its health benefits and versatility, check out our guide on
How to Make Granola Butter: Healthy, Smooth, & Gluten-Free.
What is Granola Butter & Why Make It?
At its core, granola butter is an ingenious blend of oats, nuts, and spices transformed into a spreadable butter. It's often hailed as "oatmeal butter" or "oat butter" because of its predominant oat content, which provides a nutty, cookie-like flavor reminiscent of your favorite baked goods. But it's more than just a delicious treat; it’s a nutritional powerhouse. The addition of oats significantly boosts the fiber content, contributing to a feeling of fullness and sustained energy, making it an excellent choice for keeping hunger at bay. Walnuts, a common base for this butter, are rich in omega-3 fatty acids, antioxidants, and various vitamins, adding another layer of health benefits.
Beyond its nutritional profile, granola butter offers a fantastic alternative for those with nut allergies (when made with seeds like pumpkin or sunflower instead of nuts) or anyone looking to diversify their spread options. It’s naturally free from common allergens like gluten and dairy when using certified gluten-free oats and plant-based ingredients. Making it at home also gives you complete control over the ingredients, ensuring it meets your dietary needs and preferences, free from unwanted additives or excessive sugars. For more ideas on how to incorporate this delicious spread into your diet, explore
Homemade Granola Butter: Your Delicious Nut Butter Alternative.
The Art of Toasting: Elevating Flavor and Texture
One of the most crucial, yet often overlooked, steps in achieving truly exceptional granola butter is the toasting of your core ingredients: the oats and nuts. This isn't merely an optional step; it's a foundational technique that unlocks deeper flavors and significantly aids in achieving that coveted smooth, creamy texture.
Toasting Oats and Walnuts for Optimal Flavor
Toasting is a culinary magic trick that intensifies the inherent flavors of oats and nuts. When heat is applied, a process known as the Maillard reaction occurs, transforming simple sugars and amino acids into complex compounds that give food a richer, nuttier, and more aromatic profile. For walnuts, this process also helps to release their natural oils, which is key for a smoother blend.
For oats, spread them in a single layer on a baking sheet and toast them in a preheated oven (around 300-325°F or 150-160°C) for about 10-15 minutes, stirring once or twice, until they are lightly golden and fragrant. Watch them carefully, as they can burn quickly. Follow a similar process for walnuts, keeping an even closer eye on them as nuts toast faster and can turn bitter if overdone. If you're using other add-ins like shredded coconut, toast it separately and for a shorter duration (around 5 minutes in the oven or a few minutes in a skillet) until golden, as it browns much faster than oats.
Why Toasting is Non-Negotiable
Beyond enhancing flavor, toasting serves a practical purpose when making nut and oat butters. The heat helps to break down the cellular structure of the nuts and oats, making them softer and more pliable. This means your blender will have an easier time breaking them down into a fine, smooth paste. For nuts, specifically, the released oils act as a natural lubricant, reducing blending time and preventing your blender from overheating. Skipping this step can result in a longer blending process, a grainier texture, and a less developed flavor, ultimately compromising the quality of your homemade granola butter.
Crafting the Perfect Base: Essential Ingredients for Granola Butter
While the sky's the limit for flavor variations, a successful granola butter hinges on a few core ingredients. Understanding their role is vital for achieving the right taste and consistency.
Nuts and Oats: The Dynamic Duo
* **Oats:** The foundation of granola butter, rolled oats are paramount. They provide the bulk, fiber, and that signature "oatmeal cookie" essence. It's crucial to use
rolled oats, not instant or steel-cut. Instant oats are too finely processed and won't yield the desired texture, while steel-cut oats are too coarse and won't break down adequately into a smooth butter.
* **Nuts:** Walnuts are the preferred choice for their rich flavor and high oil content, which contributes to a super creamy texture. They blend down beautifully. If walnuts aren't available or preferred, pecans make an excellent alternative. For convenience, always opt for pre-shelled nuts to save time and effort. While the reference context suggests nuts, for those with nut allergies, toasted sunflower seeds or pumpkin seeds can be a fantastic substitute, allowing everyone to enjoy this spread.
Sweeteners and Spices: The Flavor Architects
* **Sweetener:** Maple syrup or agave syrup are excellent liquid sweeteners that blend seamlessly into the butter. For a sugar-free option, a liquid monk fruit sweetener works wonderfully. It's important to use *liquid* sweeteners; granulated sugar will not dissolve properly and can leave your granola butter gritty, unless you're using powdered sugar which has a much finer consistency.
* **Spices:** The "cookie" flavor often comes alive with a thoughtful blend of warming spices. Cinnamon, nutmeg, and cardamom work harmoniously to create that comforting, familiar taste. A pinch of salt is crucial as it doesn't just add saltiness, but enhances and balances all the other flavors. For vanilla, always opt for
vanilla powder over vanilla extract. Extract contains alcohol, which can affect the consistency and shelf life, while powder blends in flawlessly, contributing pure vanilla flavor.
Oil: The Secret to Silky Smoothness (Optional, but useful)
While often referred to as "oil-free," a small amount of neutral oil can be a game-changer for achieving a truly pourable, super-smooth consistency. Coconut oil is a popular choice because it has a neutral flavor that won't overpower your granola butter. When melted, it blends in beautifully and helps thin out the texture without imparting a coconut taste. Avocado oil or even a light olive oil can also be used for similar results. This addition is particularly helpful if your granola butter is a bit too thick for your liking or if your blender struggles to achieve the ultimate silkiness.
Beyond the Basics: Exciting Add-Ins and Flavor Variations
Once you’ve mastered the basic recipe, the fun truly begins with customization. Granola butter is incredibly versatile, allowing you to tailor it to your personal taste and nutritional goals.
Boosts for Nutrition and Flavor
* **Toasted Shredded Coconut:** For an extra layer of "granola" flavor and texture, up to ¼ cup of toasted shredded coconut is a fantastic addition. Remember to toast it separately and briefly, as it browns much faster than oats.
* **Seeds:** Incorporate a few tablespoons of chia seeds or flax seeds for an omega-3 boost, added fiber, and enhanced nutritional value. These seeds will blend in seamlessly, making them a great stealthy health addition.
* **Different Spices:** Don't limit yourself to the classic blend. Experiment with pumpkin pie spice for a fall-themed butter, a hint of ginger for warmth, or even a touch of allspice.
Indulgent Chocolate Granola Butter
For chocolate lovers, transforming your granola butter into a decadent cocoa dream is incredibly simple. Add 1-2 tablespoons of unsweetened cocoa powder to your blend. Be aware that cocoa powder is a dry ingredient, so you might need to compensate by adding a little extra liquid sweetener or an additional teaspoon or two of your chosen neutral oil (coconut, avocado, or olive oil) to maintain that desired smooth consistency. This creates a rich, chocolatey spread that rivals any store-bought chocolate hazelnut butter.
Blending for Brilliance: Patience is Key
The final, and perhaps most rewarding, step in making granola butter is the blending process. While a high-speed blender does all the heavy lifting, patience is your most valuable tool here.
Choosing the Right Blender
For the smoothest possible granola butter, a high-speed blender is highly recommended. Brands like Vitamix or Blendtec excel at breaking down nuts and oats into a creamy consistency. A powerful food processor can also work, but it may take longer and require more frequent scraping, potentially resulting in a slightly less silky texture compared to a high-speed blender.
The Blending Process: A Step-by-Step Guide
After toasting your ingredients, combine the cooled oats, nuts, spices, salt, and liquid sweetener in your blender. At first, the mixture will look like a coarse crumb. Keep blending, stopping every minute or two to scrape down the sides of the blender jar with a spatula.
* **Stage 1: Crumbly Powder:** Initially, your ingredients will turn into a fine, crumbly powder. This is normal.
* **Stage 2: Thick Paste:** As you continue to blend, the oils from the nuts (and any added oil) will start to release, and the mixture will transform into a thick, sticky paste. It might seem like it’s never going to get smooth, but persist!
* **Stage 3: Smooth Butter:** Gradually, the paste will become thinner and creamier, finally reaching that luscious, spreadable consistency you’re aiming for. This entire process can take anywhere from 5 to 15 minutes, depending on the power of your blender and the specific ingredients. If your blender is struggling or overheating, give it a break for a few minutes before resuming. If the mixture is too thick, a teaspoon of neutral oil can help thin it out without compromising flavor.
Keep blending until it reaches your desired level of smoothness. The longer you blend, the creamier it will become. Once ready, transfer your homemade granola butter to an airtight jar and store it in the pantry or refrigerator.
Conclusion
Mastering
how to make granola butter is a journey into flavor, texture, and personalized nutrition. From the vital step of toasting your oats and nuts to carefully selecting your sweeteners and spices, each element plays a crucial role in creating a spread that is both deeply satisfying and incredibly versatile. This homemade delight is not just a healthier alternative to conventional nut butters; it's a testament to the simple magic of transforming wholesome ingredients into something truly extraordinary. Experiment with different spices, add-ins, and enjoy the process of crafting your perfect jar. Spread it on toast, stir it into oatmeal, drizzle it over fruit, or simply savor it by the spoonful – your taste buds (and your body) will thank you.